Supported connectors
Consult the Connector capabilities index to see the list of connectors that support automatic account provisioning and deprovisioning. Connectors with account provisioning support are marked with a 👤 symbol. Those that also support account deprovisioning are marked with a 🫥 symbol. This list is growing! We’re actively working to add account provisioning and deprovisioning support to more connectors.How does ConductorOne create new accounts?
When manually creating a new account in an application, you enter the information the app requires, such as an email address, full name, or location. Once configured using the process below, ConductorOne can automatically look up and provide that information to the application, which creates the new account. Read on to learn how it all works under the hood!Part 1: Account information is defined in a schema
For purposes of this explanation, we’ll say that SampleApp requires a first name, last name, and email in order to make a new account. First, a schema is added to the SampleApp connector code that tells ConductorOne what information is required in order to make a new user account. We’ve written the schemas for you in the supported systems listed above, but you can write your own as part of developing a connector. A schema looks like this:Required: false if the information is optional.
Part 2: CEL expressions pull in the required information
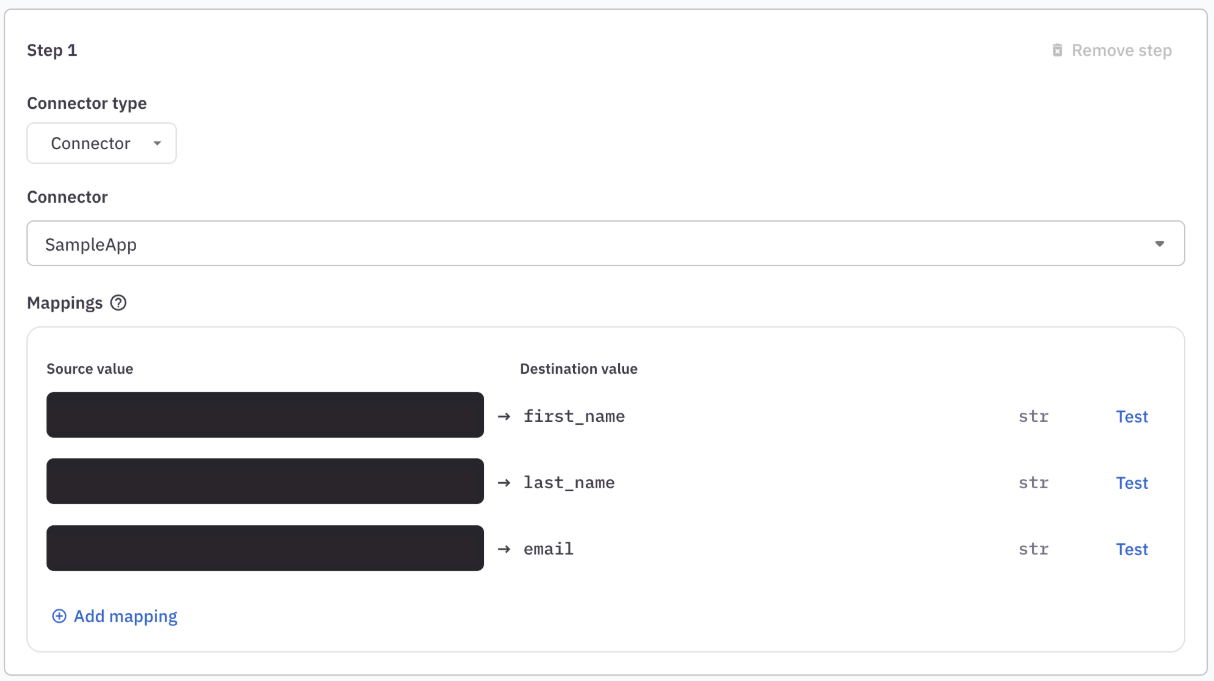
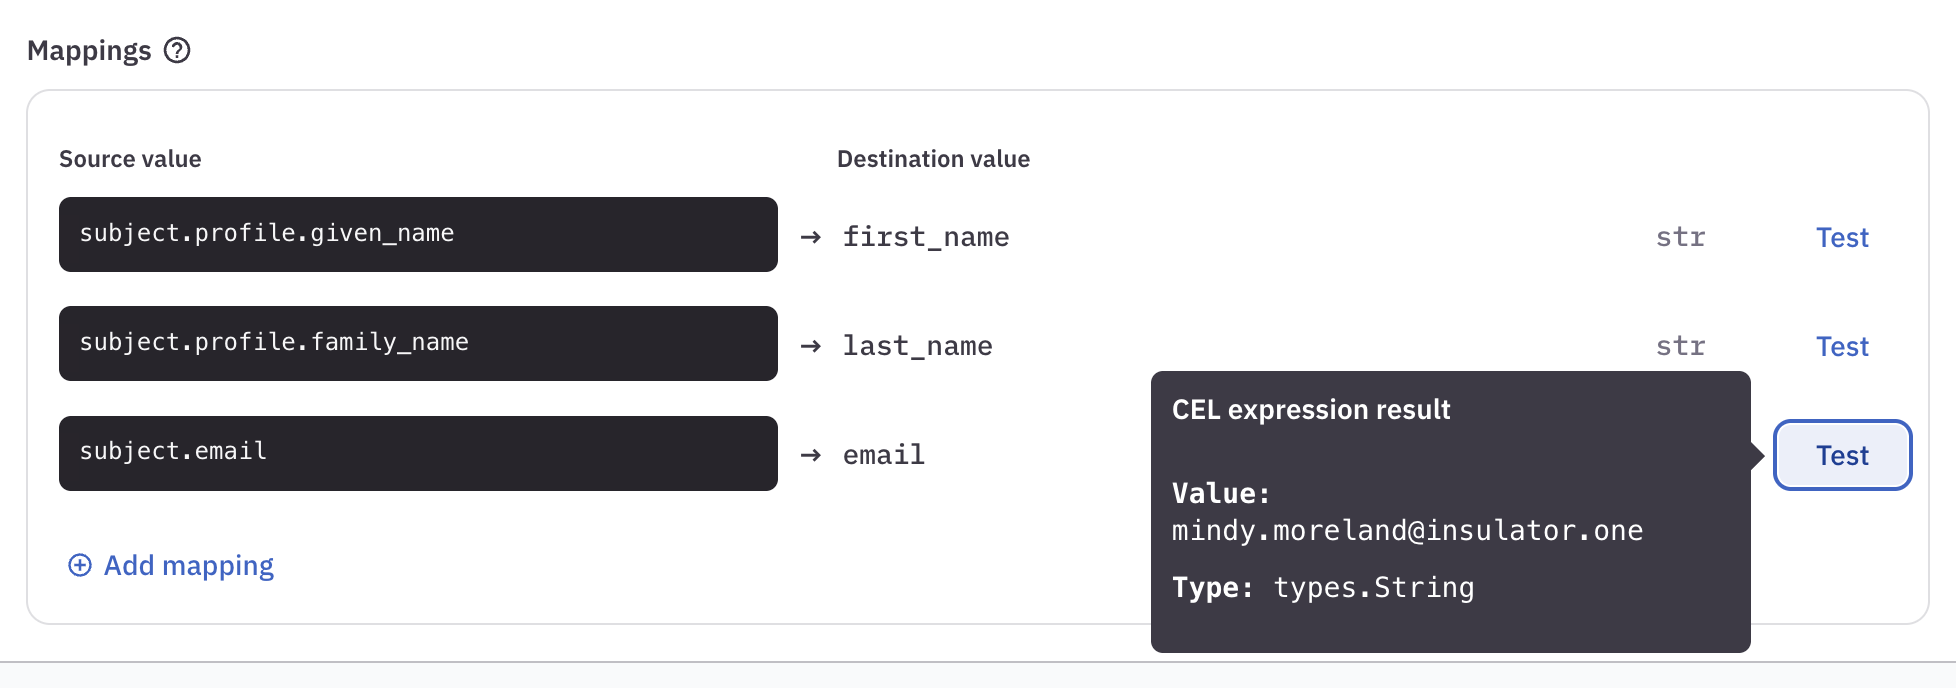
Next, you’ll tell ConductorOne how to use the accumulated user data in the system to create new accounts. To do this, you’ll set up mappings that use CEL expressions to pull and format the user data to meet the application’s requirements for a new account. That’s a little complicated, so let’s look at an example. Here’s the account provisioning setup screen for SampleApp. As you can see, the three fields set in the schema are shown here: first name, last name, and email. The notations to the right of the screen (str) show that the system expects each of these values as strings.
Writing CEL expressions for mappings
The CEL expressions you enter when setting up mappings pull the relevant account data from the accumulated store of user data in ConductorOne. This means that much of the user data you’ll want to reference is pulled from your directory apps. Thesubject object expressions (where subject refers to the ConductorOne user) are especially helpful here. In particular, you might need to use the CEL expression subject.attributes.<ATTRIBUTE> where <ATTRIBUTE> can be replaced by any profile attributes pulled in from the relevant directory apps. You can see the available profile attributes by navigating to any user’s details page.
Why can’t ConductorOne write these CEL expressions for me?
Because of the variety of ways that information is labeled and pulled in from the many directory apps ConductorOne supports, there is significant variation in the way the CEL expressions must be formed. Additionally, based on the requirements and best practices of your organization, you might need the data returned in a specific format. One size, unfortunately, does not fit all. Our Customer Success team is happy to lend a hand if you’re struggling to set up your CEL expressions. You might also find it useful to work with an AI tool if you’re unfamiliar with CEL syntax.Configure account provisioning
On the app’s Controls tab, locate the Accounts management section of the page. Click Edit next to Provisioning. The provisioning configuration drawer opens.
Select Connector from the dropdown, then select the connector you set up for this app. The Mappings panel is shown.The mapping fields are pulled directly from the account provisioning schema in the connector’s code. These are the values that the application requires in order to create a new account.
Write CEL expressions to tell ConductorOne how to find the information required by the schema.
If the connector automatically generates starter passwords for new accounts, you can save these in a vault. (Follow these instructions to set up a vault if you haven’t done so already.) In the Password storage area of the page, select Save to vault and select the correct vault.
Frequently asked questions about automatic account provisioning
Can ConductorOne update the accounts it creates?
Can ConductorOne update the accounts it creates?
If a user’s key data (such as their name or location) changes, ConductorOne does not currently have a mechanism to update the information on an automatically created account. The user’s account information must be updated in the connected software, and the change will be pulled into ConductorOne on the next connector sync.